本文将展示如何使用 Red-Green-Refactor 方法创建应用程序,重点是编写单元和集成测试。 在上一篇文章(第一部分)中,您可以找到对小部件测试的解释以及对 Red-Green-Refactor 节奏的介绍。
就像小部件测试一样,我们需要遵循 3 个步骤/颜色:
现在,让我们提醒自己我们想要什么:一个带有一个按钮的简单屏幕,它将获取数据并在对话框中向我们显示当前天气。
由于此屏幕的 UI 部分已在上一篇文章中实现,因此我们将从显示需求和功能之间的契约的集成测试开始。
集成测试
集成测试涵盖了我们应用程序的行为。 所以,我们要确保消息和按钮是可见的。 当用户点击按钮时,天气将显示在对话框中。 关闭时,用户将再次看到之前的状态。
所以,让我们深入红色区域!
void _testMain() {
  IntegrationTestWidgetsFlutterBinding.ensureInitialized();
  late Dio dio;
  late MyApp app;

  Future initializeApp() async {
    dio = Dio()..httpClientAdapter = StubHttpClientAdapter(StubResponderImpl());

    final moduleHandler =
        ModuleHandler.initialize(location: location, dio: dio);

    app = MyApp(moduleHandler: moduleHandler);
  }

  setUp(() async {
    await initializeApp();
  });

  testWidgets('integration test', (WidgetTester tester) async {
    runApp(app);
    await tester.pumpAndSettle();

    expect(find.text('Hello World!'), findsOneWidget);
    expect(find.text('Weather today'), findsOneWidget);
    expect(find.byKey(Key('icon_weather')), findsOneWidget);

    await tester.tap(find.text('Weather today'));
    await tester.pumpAndSettle(Duration(seconds: 3));

    expect(find.byType(AlertDialog), findsOneWidget);
    expect(find.text('Clouds'), findsOneWidget);
    expect(find.text('few clouds'), findsOneWidget);
    expect(find.text('temp: 13.36° C'), findsOneWidget);
  });
}
如您所见,我们需要实现存根响应器。 它将拦截 API 调用并为我们提供我们模拟的数据。 模拟数据将为我们提供可预测的响应,我们将避免网络调用。
class StubResponderImpl implements StubResponder {
const StubResponderImpl();
@override
Future respond(final Request request) async {
if (request.uri.host == 'api.openweathermap.org' &&
request.uri.path == '/data/2.5/weather') {
return LocalResponse.success(
'''
{
"weather": [
{
"main": "Clouds",
"description": "few clouds"
}
],
"main": {
"temp": 13.36
}
}
''',
headers: {'content-type': 'application/hal+json;charset=UTF-8'},
);
}
return LocalResponse(
'{"error": "Not found ${request.uri}"}',
statusCode: 404,
headers: {'content-type': 'application/hal+json;charset=UTF-8'},
);
}
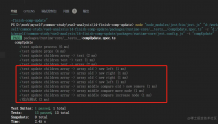
} 在我们实现所有必要的功能之前,这个测试不会进入绿色区域,但我们已经为自己设定了目标。 我们不能再出错了,因为我们已经定义了期望的行为。 为了确定,让我们运行测试,看看它会如何失败。
flutter drive --driver=integration_test/driver.dart --target=integration_test/app_test.dart现在关于集成测试没有什么可做的,所以让我们从单元测试开始。
单元测试
将首先验证 API 调用。 我们希望确保如果我们发送正确的数据,URI 将被正确复合。 让我们创建一个“api_test”文件并编写我们的第一个单元测试。
test(
  'sends get request to valid endpoint',
  () async {
    builder.withSuccessfulGetResponse(
      {
        'weather': [
          {
            'main': "Clouds",
            'description': "few clouds",
            'icon': "02d",
          }
        ],
        'main': {
          'temp': 13.36,
        },
      },
    );

    await api.getWeather(
      lat: '1',
      lon: '2',
    );

    verify(
      () => dio.getUri(
        Uri.parse(
          'https://api.openweathermap.org/data/2.5/weather?lat=1'
      '&lon=2&appid=YOURAPPID&units=metric',
        ),
      ),
    );
  },
);
还不需要运行颤振测试,因为我们遇到了编译器错误。 没有 getWeather 方法,我们现在将在新的 api.dartfile 中实现它。
Future getWeather({
  required String lat,
  required String lon,
}) async {
  final response = await dio.getUri(
    Uri.parse('$_hostName?lat=$lat&lon=$lon&appid=$_apiKey&units=metric'),
  );

  return Forecast.fromJson(response.data);
}
现在是 Flutter 测试的最佳时机,我们可以在绿区享受我们的时光。
下一个任务是获取用户的位置。 其实,不! 下一个任务是编写一个获取用户位置的测试。
test(
  'get location',
  () async {
    final currentLocation = LocationData.fromMap({
      'latitude': 1.2,
      'longitude': 3.4,
    });
    builder
      ..withServiceEnabled()
      ..withPermission()
      ..withLocation(currentLocation);

    final _location = await register.getLocation();

    expect(_location, currentLocation);
  },
);
由于还没有实现 getLocation 方法,我们想从红色区域移动到绿色区域,让我们实现它。
Future getLocation() async {
  bool _serviceEnabled;
  PermissionStatus _permissionGranted;
  LocationData _locationData;

  _serviceEnabled = await location.serviceEnabled();
  if (!_serviceEnabled) {
    _serviceEnabled = await location.requestService();
    if (!_serviceEnabled) {
      throw Exception('Service is not enabled');
    }
  }

  _permissionGranted = await location.hasPermission();
  if (_permissionGranted == PermissionStatus.denied) {
    _permissionGranted = await location.requestPermission();
    if (_permissionGranted != PermissionStatus.granted) {
      throw Exception('Permission is not granted');
    }
  }

  _locationData = await location.getLocation();

  return _locationData;
}
正如您在上面的代码中看到的,我们首先需要用户的许可才能获取位置,这就是我们需要在集成测试中覆盖位置许可的原因。 让我们打开我们的驱动程序文件并授予测试权限。
Future main() async {
  integrationDriver();
  await Process.run(
    'adb',
    [
      'shell',
      'pm',
      'grant',
      'com.example.flutter_tdd',
      'android.permission.ACCESS_FINE_LOCATION'
    ],
  );
}
如果还有什么需要重构的,现在是最佳时机。
颤振测试,我们完成了第二个 Red-Green-Refactor 循环! 那强大的节奏之力!
我将在这里再经历一个周期,该周期将用于根据位置数据获取天气。
所以,一如既往,先测试!
test(
  'get weather by location',
  () async {
    final currentLocation = LocationData.fromMap({
      'latitude': 1.2,
      'longitude': 3.4,
    });
    builder
      ..withServiceEnabled()
      ..withPermission()
      ..withLocation(currentLocation)
      ..withForecast(
        {
          'weather': [
            {
              'main': "Clouds",
              'description': "A lot of clouds",
            }
          ],
          'main': {
            'temp': 12.1,
          },
        },
      );

    final weather = await register.getWeather(currentLocation);

    expect(
      weather,
      Forecast(
        main: Temperature(temp: 12.1),
        weather: [
          Weather(
            main: 'Clouds',
            description: 'A lot of clouds',
          )
        ],
      ),
    );
  },
);
getWeather 是红色的,因为我们没有在天气寄存器中实现该方法。 绿色地带,我们来了!
Future getWeather(LocationData locationData) {
  return Api(dio).getWeather(
    lat: locationData.latitude.toString(),
    lon: locationData.longitude.toString(),
  );
}
颤振测试,我们的测试通过了!
注意:为简单起见并专注于 TDD 节奏,部分实现代码已被省略。 项目内部是一个测试,用于在获取数据时显示对话框以及我们需要使这个应用程序工作的更多东西(例如模型、天气对话框的实现代码等)。
回到集成测试
一旦我们实现了逻辑,将我们的按钮与获取位置和天气数据连接起来,然后创建一个向用户显示该数据的对话框,让我们回到我们的集成测试。 运行以下命令并检查手机上的魔法。
flutter drive --driver=integration_test/driver.dart --target=integration_test/app_test.dart很好,我们做到了。 我们的天气应用程序完全按照 TDD Red-Green-Refactor 节奏开发。
结论
Bob 大叔说:“单元测试是程序员的文档”,我完全同意。 在很多情况下,我通过阅读测试而不是在整个项目中遵循实现代码来更容易理解一个特性。 我在本文中只包含了快乐路径的测试,但总的来说,测试应该涵盖我们能想到的所有可能场景以及我们编写的每一行代码。 这应该是一个通过简单的 TDD 节奏来挑战我们自己和我们的代码的机会。 最后,编写更多测试可以保证我们以后可以自由更改代码。 谁不喜欢自由?
直到下一篇文章! 谢谢!
| 留言与评论(共有 0 条评论) “” |